Table of Contents
Introduction:
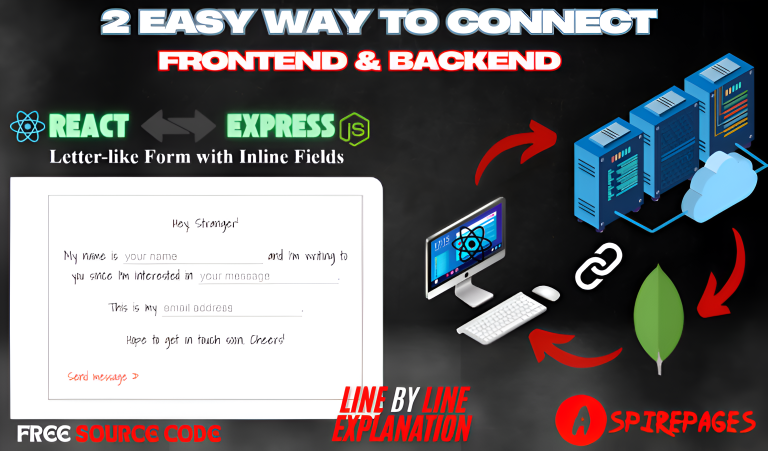
Smooth communication between the frontend and backend useing MERN stack is essential in modern web applications. In this tutorial, we’ll use Vite React to create a Contact Us page that sends form data to an Express.js backend, which then stores it in MongoDB. Additionally, we’ll ensure proper error handling, validation, and return a success message to the frontend.
Building a MERN stack application requires a clear understanding of how data flows between the frontend (React) and the backend (Node.js & Express), along with database interactions in MongoDB. In this guide, we will explore on to implementing data flow in a MERN stack application, ensuring efficient and secure communication between all components.
By the end of this tutorial, you’ll have a fully functional MERN stack setup in a simple way and simple language and with explanation:
✅ Frontend form validation using React Hook Form :
✅ Backend validation using Express Validator
✅ Secure API communication with Axios
✅ MongoDB integration using Mongoose
✅ Success/error response handling
Setup MERN stack useing REST API (Using Express & MongoDB)
This approach involves creating a RESTful API using Express and connecting it to MongoDB.
Step 1: Setting Up React (Frontend)
We’ll use Vite to create a React app with a simple form that sends user reviews to our backend.
- HTML: For structuring the card layout.
- CSS: For styling the HTML card and giving it the desired visual effects.
- JavaScript: For adding interactivity and animations to the card.
- Familiarity with Three.js is a bonus but not mandatory, as this guide will walk you through its usage.
2. Required Tools
Make sure you have these tools ready for efficient development:
- A text editor like VS Code to write and organize your code.
- A browser (e.g., Chrome or Firefox) to preview your HTML card animation.
- A stable internet connection to load external libraries like Vite react .
3. Libraries Used and installation steps
🔹 Frontend (Vite React)
Navigate to your frontend folder and install these dependencies:
1️⃣ Required Dependencies (Must Install)
npm install axios
- axios → To make HTTP requests from React to the backend
2️⃣ Additional Dependencies (Optional, Based on Features)
npm install react-router-dom
- react-router-dom → For client-side routing in React.
🔹 Backend (Node.js, Express, MongoDB)
Navigate to your backend folder and install these dependencies:
1️⃣ Required Dependencies (Must Install)
npm install express mongoose cors dotenv
- express → Web framework for Node.js
- mongoose → ODM (Object Data Modeling) for MongoDB
- cors → Enables Cross-Origin Resource Sharing
- dotenv → Manages environment variables
2️⃣ Developer Dependencies (For Development)
npm install -g nodemon
- nodemon → Automatically restarts the server when file change
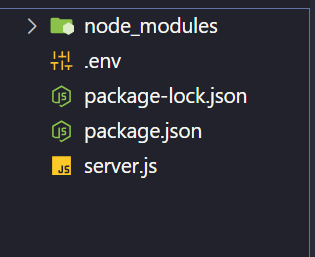
Project structure:
Let’s take a look at how our project structure will look like :
Frontend (Vite react):

backend(express +mongo db +node js):
Step 1: Setting Up React (Frontend) :
ReactCode (contactform.jsx)
import { useState } from "react";
import "./ContactForm.css";
const ContactForm = () => {
const [formData, setFormData] = useState({
name: "",
message: "",
email: "",
});
const [isLoading, setIsLoading] = useState(false);
const [responseMessage, setResponseMessage] = useState("");
// Handle input change
const handleChange = (e) => {
setFormData({ ...formData, [e.target.name]: e.target.value });
};
// Handle form submission
const handleSubmit = async (e) => {
e.preventDefault();
setIsLoading(true);
setResponseMessage("");
try {
const response = await fetch("http://localhost:5000/submit-form", {
method: "POST",
headers: { "Content-Type": "application/json" },
body: JSON.stringify(formData),
});
const result = await response.json();
if (result.success) {
setResponseMessage("✅ Your message has been stored successfully!");
setFormData({ name: "", message: "", email: "" });
} else {
setResponseMessage("❌ Something went wrong. Please try again!");
}
} catch (error) {
console.error("Error submitting form:", error);
setResponseMessage("❌ Error connecting to the server.");
} finally {
setIsLoading(false);
}
};
return (
<div className="wrapper">
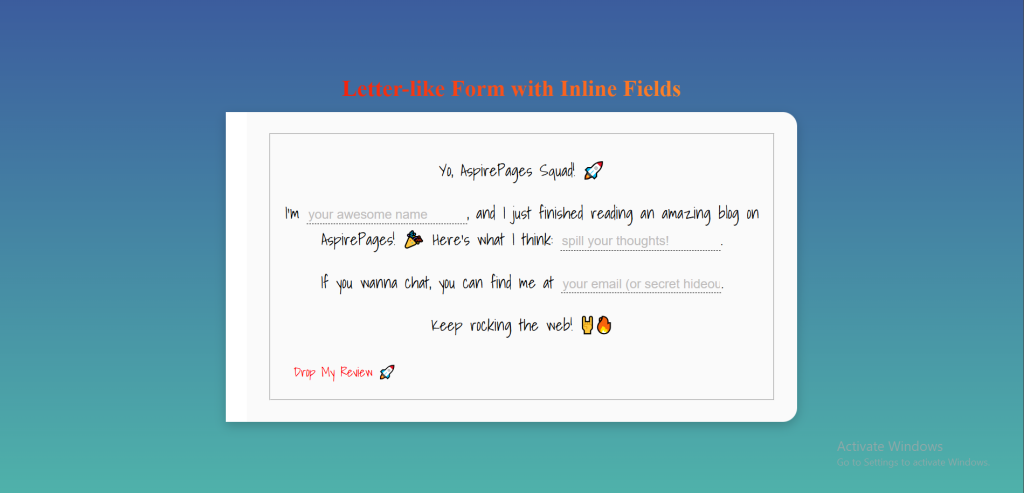
<h1>Letter-like Form with Inline Fields</h1>
<form onSubmit={handleSubmit} className="form__contact">
<fieldset>
<p>Yo, AspirePages Squad! 🚀</p>
<p>
I’m{" "}
<input
type="text"
name="name"
placeholder="your awesome name"
value={formData.name}
onChange={handleChange}
className="form__field"
required
/>
, and I just finished reading an amazing blog on AspirePages! 🎉
Here’s what I think:{" "}
<input
type="text"
name="message"
placeholder="spill your thoughts!"
value={formData.message}
onChange={handleChange}
className="form__field"
required
/>
.
</p>
<p>
If you wanna chat, you can find me at{" "}
<input
type="email"
name="email"
placeholder="your email (or secret hideout)"
value={formData.email}
onChange={handleChange}
className="form__field"
required
/>
.
</p>
<p>Keep rocking the web! 🤘🔥</p>
<button type="submit" disabled={isLoading}>
{isLoading ? "Submitting..." : "Drop My Review 🚀"}
</button>
{responseMessage && <p className="response">{responseMessage}</p>}
</fieldset>
</form>
</div>
);
};
export default ContactForm;
Step 2 : CSS For MERN stack communication (contactform.css):
We’ll use Vite to create a React app with a simple form that sends user reviews to our backend.
Add this into index.html in the react folder to import the fonts i have used :
<link href="https://fonts.googleapis.com/css2?family=Roboto+Slab:wght@400&family=Shadows+Into+Light&display=swap" rel="stylesheet">CSS Code
/* Global Styles */
* {
    box-sizing: border-box;


  }

  body {
    display: flex;
    align-items: center;
    justify-content: center;
    min-height: 100vh;
    background: linear-gradient(to bottom, #3b5a9d, #4fb2aa);
  }

  /* Wrapper */
  .wrapper {
    text-align: center;
    color: white;
  }
  .wrapper h1 {
    margin-bottom: 15px;
    background-image: linear-gradient(90deg, #f40000, #ffa633);
  -webkit-text-fill-color: transparent;
  -webkit-background-clip: text;
  background-clip: text;
  }

  /* Form Container */
  .form__contact {
    max-width: 800px;
    margin: 0 auto;
    padding: 30px;
    font-weight: 500;
    background: #fafafa;
    border-left: 30px solid white;
    border-radius: 0 20px 20px 0;
    font-family: "Shadows Into Light", cursive;
    font-size:23px;
    color: #000;
    box-shadow: 0 5px 15px rgba(0, 0, 0, 0.2);
}

  /* Form Fields */
  .form__field {
    border: none;
    border-bottom: 1px dashed #000000;
    outline: none;
    min-width: 100px;
    padding: 2px;
    font-size: 18px;
    color: #000000;
    background: transparent;
  }

  .form__field::placeholder {
    color: #c0bcbc;
  }

  /* Submit Button */
  button {
    display: block;
    margin-top: 20px;
    padding: 10px 15px;
    border: none;
    font-family: "Shadows Into Light", cursive;
    font-size: 18px;
    color: #ff0004;
    background: transparent;
    cursor: pointer;
    transition: transform 0.25s ease;
  }

  button:hover {
    transform: translateX(10px);
  }
Step 3 :Backend (Node.js & Express):
Server.js Code
const express = require("express");
const mongoose = require("mongoose");
const cors = require("cors");
const dotenv = require("dotenv");

dotenv.config();
const app = express();
app.use(express.json());
app.use(cors());

// Connect to MongoDB
mongoose.connect(process.env.MONGO_URI, {
  useNewUrlParser: true,
  useUnifiedTopology: true,
});

const ContactSchema = new mongoose.Schema({
  name: String,
  message: String,
  email: String,
});

const Contact = mongoose.model("Contact", ContactSchema);

// API Route to Handle Form Submission
app.post("/submit-form", async (req, res) => {
  try {
    const { name, message, email } = req.body;
    console.log(req.body);
    const newContact = new Contact({ name, message, email });
    await newContact.save();

    res.json({ success: true, message: "Thank you for your comment!" });
  } catch (error) {
    res.status(500).json({ success: false, message: "Server Error" });
  }
});

const PORT = process.env.PORT || 5000;
app.listen(PORT, () => console.log(`Server running on port ${PORT}`));
Step 4 :Setting Up MongoDB Atlas & Getting the Connection URI:
Steps for creation :
MongoDB Atlas is a cloud-based MongoDB service that allows us to host our database without needing a local setup. Follow these steps to create a MongoDB Atlas database and obtain the connection URI.
🔹 Create a MongoDB Atlas Account
- Go to MongoDB Atlas and sign up for a free account.
- After logging in, click on “Create a Database” and select “Shared” (Free Tier).
- Choose AWS, GCP, or Azure as your cloud provider (AWS is recommended).
- Select the region closest to your location for better performance.
- Click “Create Cluster” and wait a few minutes for MongoDB Atlas to provision your cluster.
🔹 Create a Database & Collection
- Once your cluster is ready, click “Browse Collections” → Click “Add My Own Data”.
- Name your database (e.g.,
AspirePagesDB). - Create a collection inside it (e.g.,
contacts).
🔹 Get the Connection URI
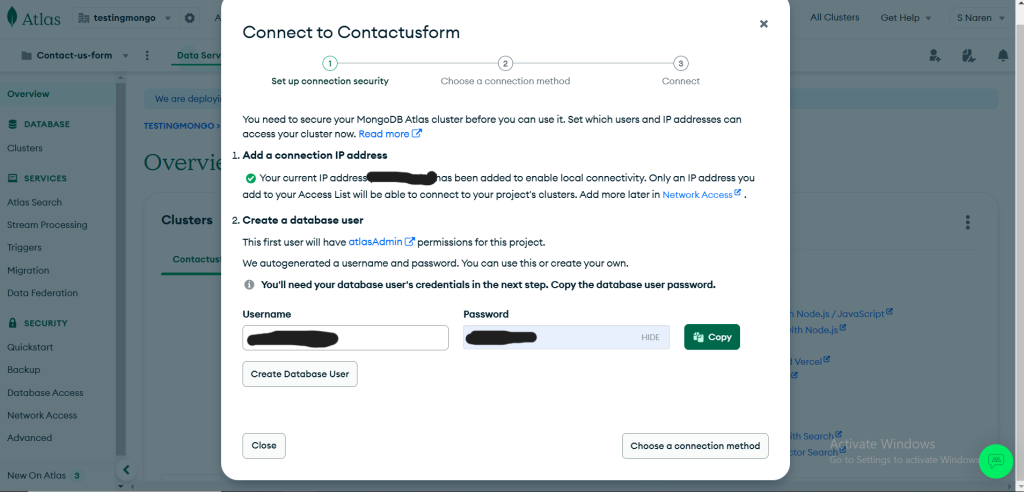
- In MongoDB Atlas, go to Database → Click “Connect”.
- Choose “Connect Your Application”.
- Copy the MongoDB URI, which looks like this:
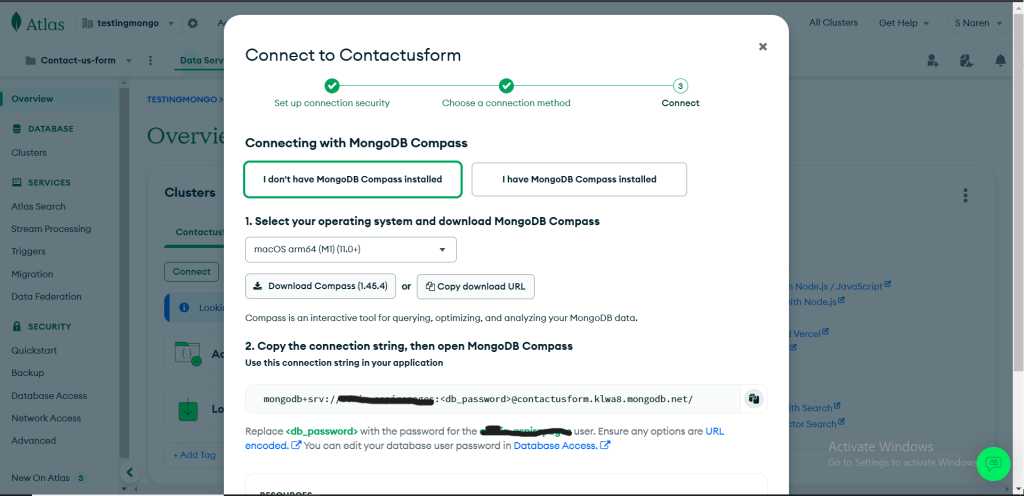
mongodb+srv://<username>:<password>@cluster0.mongodb.net/?retryWrites=true&w=majority
- Replace
<username>and<password>with your database credentials.
🔹 Store the MongoDB URI in .env File
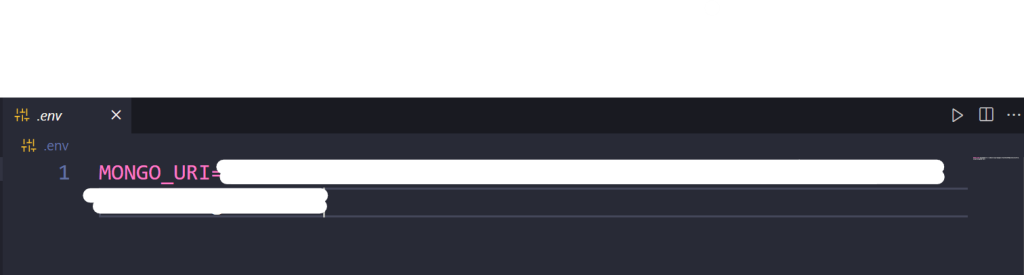
Create a .env file in your backend project and add:
MONGO_URI=mongodb+srv://yourUser:yourPassword@cluster0.mongodb.net/AspirePagesDB?retryWrites=true&w=majority
PORT=5000📌 Line-by-Line Explanation of MERN Stack Data Flow (Frontend & Backend)
In this section, I’ll break down how data flows between the frontend (React & Vite) and the backend (Node.js, Express, MongoDB Atlas). Each part of the code will be explained step by step to help you understand the connection between them.
🌟 Data Flow Overview
- Frontend (React)
- The user fills out a form and submits data.
- The form sends data to the backend via an API request (
fetch). - The response from the backend is displayed on the UI.
- Backend (Node.js & Express)
- The backend receives the request from React.
- It processes the data and stores it in MongoDB Atlas.
- The backend sends a response back to React.
🚀 Step-by-Step Backend (Node.js & Express) Explanation
Here is the server.js file:
const express = require("express");
const mongoose = require("mongoose");
const cors = require("cors");
const dotenv = require("dotenv");

dotenv.config();
const app = express();
app.use(express.json());
app.use(cors());

// Connect to MongoDB Atlas
mongoose.connect(process.env.MONGO_URI, {
  useNewUrlParser: true,
  useUnifiedTopology: true,
})
.then(() => console.log("✅ MongoDB Connected"))
.catch((err) => console.error("❌ MongoDB Connection Error:", err));

const ContactSchema = new mongoose.Schema({
  name: String,
  message: String,
  email: String,
});

const Contact = mongoose.model("Contact", ContactSchema);

// API Route to Handle Form Submission
app.post("/submit-form", async (req, res) => {
  try {
    const { name, message, email } = req.body;
    const newContact = new Contact({ name, message, email });
    await newContact.save();

    res.json({ success: true, message: "Thank you for your comment!" });
  } catch (error) {
    res.status(500).json({ success: false, message: "Server Error" });
  }
});

const PORT = process.env.PORT || 5000;
app.listen(PORT, () => console.log(`🚀 Server running on port ${PORT}`));
📌 Code Breakdown (Backend)
- Importing Required Modules jsCopyEdit
const express = require("express"); const mongoose = require("mongoose"); const cors = require("cors"); const dotenv = require("dotenv");- express → Framework to create a backend server.
- mongoose → Connects Node.js to MongoDB Atlas.
- cors → Allows cross-origin requests (needed for frontend-backend communication).
- dotenv → Loads environment variables from
.env.
- Load Environment Variables jsCopyEdit
dotenv.config();- This reads
.envvariables, including the MongoDB URI.
- This reads
- Initialize Express App & Middleware jsCopyEdit
const app = express(); app.use(express.json()); app.use(cors());express.json()→ Parses incoming JSON requests.cors()→ Prevents CORS errors when connecting frontend & backend.
- Connect to MongoDB Atlas jsCopyEdit
mongoose.connect(process.env.MONGO_URI, { useNewUrlParser: true, useUnifiedTopology: true, }) .then(() => console.log("✅ MongoDB Connected")) .catch((err) => console.error("❌ MongoDB Connection Error:", err));mongoose.connect(process.env.MONGO_URI, { options })→ Connects to MongoDB Atlas using .env credentials.- If the connection is successful, it prints
"✅ MongoDB Connected". - If an error occurs, it prints
"❌ MongoDB Connection Error".
- Define a Mongoose Schema & Model jsCopyEdit
const ContactSchema = new mongoose.Schema({ name: String, message: String, email: String, }); const Contact = mongoose.model("Contact", ContactSchema);- Creates a
ContactSchemadefining three fields:name,message,email. - Creates a
Contactmodel that interacts with thecontactscollection.
- Creates a
- Create API Route to Handle Form Submission jsCopyEdit
app.post("/submit-form", async (req, res) => { try { const { name, message, email } = req.body; const newContact = new Contact({ name, message, email }); await newContact.save(); res.json({ success: true, message: "Thank you for your comment!" }); } catch (error) { res.status(500).json({ success: false, message: "Server Error" }); } });- POST
/submit-form→ Handles form submissions. - Extracts
name,message, andemailfromreq.body. - Creates a new
Contactdocument and saves it to MongoDB. - Sends a response
{ success: true, message: "Thank you for your comment!" }if successful.
- POST
- Start the Server jsCopyEdit
const PORT = process.env.PORT || 5000; app.listen(PORT, () => console.log(`🚀 Server running on port ${PORT}`));- Starts the backend server on port 5000.
🚀 Step-by-Step Frontend (React) Explanation
Here is ContactForm.jsx:
import { useState } from "react";
import "./ContactForm.css";

const ContactForm = () => {
  const [formData, setFormData] = useState({
    name: "",
    message: "",
    email: "",
  });

  const [isLoading, setIsLoading] = useState(false);
  const [responseMessage, setResponseMessage] = useState("");

  // Handle input change
  const handleChange = (e) => {
    setFormData({ ...formData, [e.target.name]: e.target.value });
  };

  // Handle form submission
  const handleSubmit = async (e) => {
    e.preventDefault();
    setIsLoading(true);
    setResponseMessage("");

    try {
      const response = await fetch("http://localhost:5000/submit-form", {
        method: "POST",
        headers: { "Content-Type": "application/json" },
        body: JSON.stringify(formData),
      });

      const result = await response.json();
      if (result.success) {
        setResponseMessage("✅ Your message has been stored successfully!");
        setFormData({ name: "", message: "", email: "" });
      } else {
        setResponseMessage("❌ Something went wrong. Please try again!");
      }
    } catch (error) {
      console.error("Error submitting form:", error);
      setResponseMessage("❌ Error connecting to the server.");
    } finally {
      setIsLoading(false);
    }
  };

  return (
    <div className="wrapper">
      <h1>Letter-like Form with Inline Fields</h1>
      <form onSubmit={handleSubmit} className="form__contact">
        <fieldset>
          <p>Yo, AspirePages Squad! 🚀</p>
          <p>
            I’m <input type="text" name="name" placeholder="your name" value={formData.name} onChange={handleChange} required />
            , and I just finished reading an amazing blog! 🎉
          </p>
          <p>
            Here’s what I think: <input type="text" name="message" placeholder="your thoughts" value={formData.message} onChange={handleChange} required />
          </p>
          <p>
            If you wanna chat, you can find me at <input type="email" name="email" placeholder="your email" value={formData.email} onChange={handleChange} required />
          </p>
          <button type="submit" disabled={isLoading}>
            {isLoading ? "Submitting..." : "Drop My Review 🚀"}
          </button>
          {responseMessage && <p className="response">{responseMessage}</p>}
        </fieldset>
      </form>
    </div>
  );
};

export default ContactForm;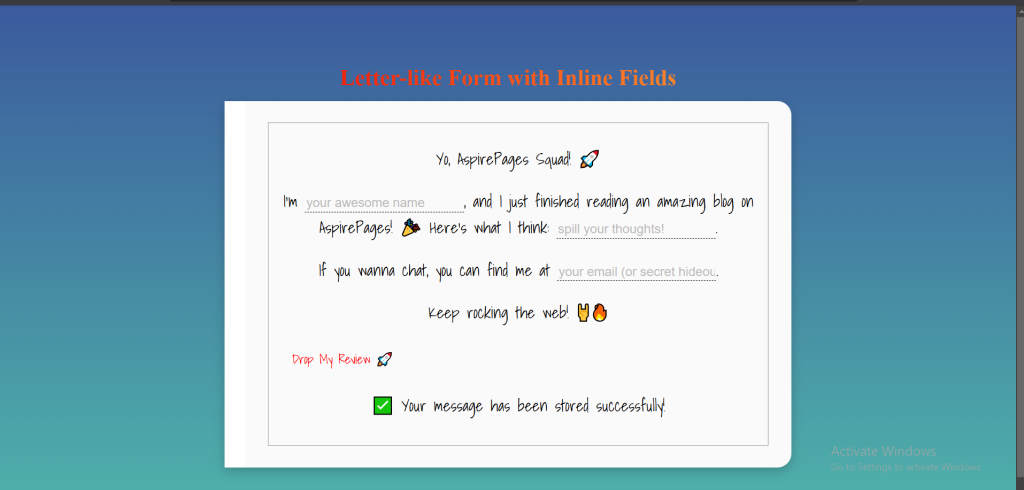
Download the complete code for free :